help@tokenrewards.com
Admin.Token User Guide

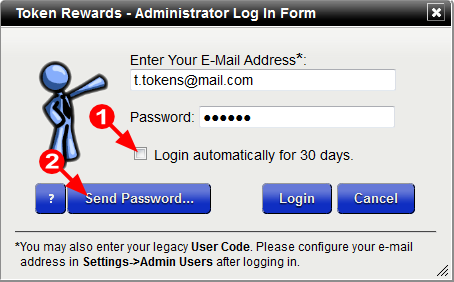
 Place a check before "Login automatically..." to save a browser cookie
which will automatically log you in the next time you visit Admin.Token.
Click "Log Out" to delete the cookie. It self-deletes in 30 days.
Place a check before "Login automatically..." to save a browser cookie
which will automatically log you in the next time you visit Admin.Token.
Click "Log Out" to delete the cookie. It self-deletes in 30 days.
 If you've forgotten your password, enter your e-mail address to enable the
"Send Password..." button.
After clicking it, and if the e-mail entered is a valid Admin.Token user account,
a link will be delivered to the address. Click the link
in the e-mail to automatically log in. Click the "Edit My Account" link
after logging in to change your password.
If you've forgotten your password, enter your e-mail address to enable the
"Send Password..." button.
After clicking it, and if the e-mail entered is a valid Admin.Token user account,
a link will be delivered to the address. Click the link
in the e-mail to automatically log in. Click the "Edit My Account" link
after logging in to change your password.

 Your reward program's name and user name are displayed here.
 Click the "Log Out" link to ensure nobody uses Admin.Token without
your authorization. Especially important if your participants
use this computer.
Click the "Log Out" link to ensure nobody uses Admin.Token without
your authorization. Especially important if your participants
use this computer.
 Click the "Help" link to open the Admin.Token User's Guide (what you're currently reading).
 The "Edit My Account" link will open the following dialog:
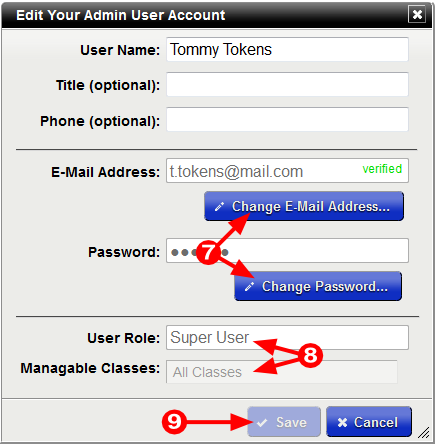
 Click the appropriate button to change your e-mail address or password.
Note that you will have to confirm a new e-mail address if you change either one.
You will also be sent a confirm confirmation e-mail, if changed.
Click the appropriate button to change your e-mail address or password.
Note that you will have to confirm a new e-mail address if you change either one.
You will also be sent a confirm confirmation e-mail, if changed.
 Your "User Role" and "Manageable Classes" can only be changed by a Super-User
in the Settings area. See more at Settings > Users.
Your "User Role" and "Manageable Classes" can only be changed by a Super-User
in the Settings area. See more at Settings > Users.
 The save button will enable if you change you user name, title, or phone number.
Click to save your changes and close the dialog.
The save button will enable if you change you user name, title, or phone number.
Click to save your changes and close the dialog.


 Only the participant may change his or her e-mail address once it has been verified
and their Shop.Token account has been password protected.
Only the participant may change his or her e-mail address once it has been verified
and their Shop.Token account has been password protected.
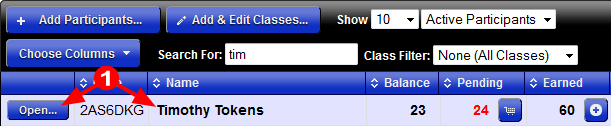 Open a participant's account record by clicking the "Open..." button
on the Participants Grid, or double-click anywhere on the row.
Open a participant's account record by clicking the "Open..." button
on the Participants Grid, or double-click anywhere on the row.
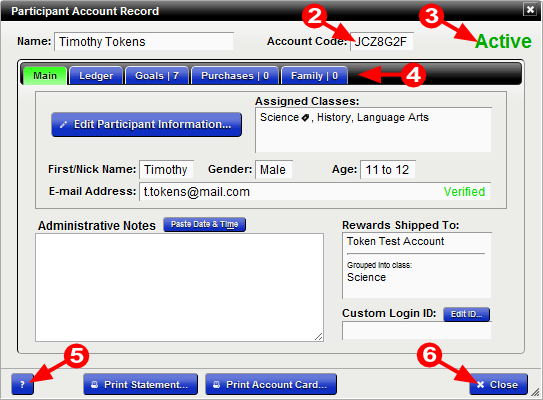 Each participant is assigned a unique Account Code having
seven random characters generated
when the participant account is created. Everywhere in Admin.Token that you
can search a participant's name, you can also search using their assigned account code.
Participants must have a status of "Active" to log into Shop.Token and spend
their tokens. You can change a participant's status to "Inactive" by
Editing Participant Information.
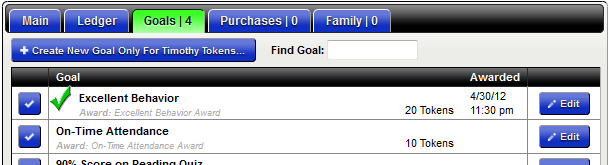
The five tabs of the Participant Window are explained in upcoming topics.
The numbers to the right of tab titles are meant to be a quick summary total
of the information under each tab.
The question mark button opens the Admin.Token User Guide to this topic
(what you're currently reading).
Click the close button or the "X" in the top-right corner to close the window.
Each participant is assigned a unique Account Code having
seven random characters generated
when the participant account is created. Everywhere in Admin.Token that you
can search a participant's name, you can also search using their assigned account code.
Participants must have a status of "Active" to log into Shop.Token and spend
their tokens. You can change a participant's status to "Inactive" by
Editing Participant Information.
The five tabs of the Participant Window are explained in upcoming topics.
The numbers to the right of tab titles are meant to be a quick summary total
of the information under each tab.
The question mark button opens the Admin.Token User Guide to this topic
(what you're currently reading).
Click the close button or the "X" in the top-right corner to close the window.
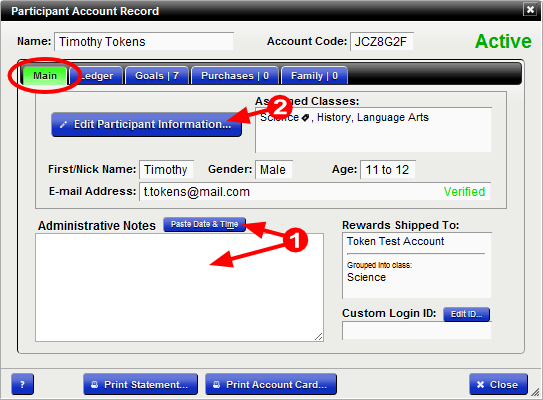 Freely type any administrative notes about the participant in this area.
Click the "Paste Date/Time" button
(or Ctrl+Shift+M) to timestamp your remarks before typing them.
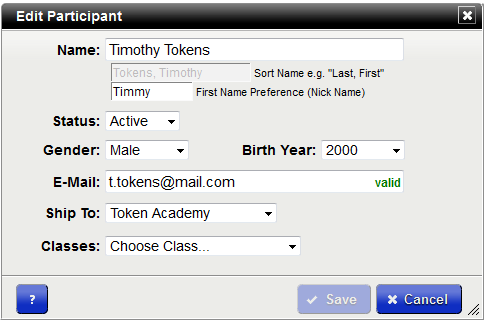
Click the "Edit Participant..." button to change any of
the participant's information displayed on the Main tab.
The "Edit Participant" dialog will appear like the example below.
Freely type any administrative notes about the participant in this area.
Click the "Paste Date/Time" button
(or Ctrl+Shift+M) to timestamp your remarks before typing them.
Click the "Edit Participant..." button to change any of
the participant's information displayed on the Main tab.
The "Edit Participant" dialog will appear like the example below.
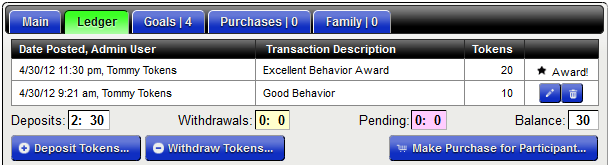
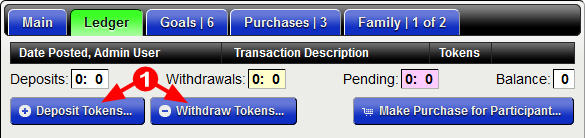 To create a miscellaneous deposit or withdrawal on a participant's account,
click either the "Deposit Tokens..." or "Withdraw Tokens..." button.
Shown below is an example of a 10 token deposit for "Good Behavior":
To create a miscellaneous deposit or withdrawal on a participant's account,
click either the "Deposit Tokens..." or "Withdraw Tokens..." button.
Shown below is an example of a 10 token deposit for "Good Behavior":
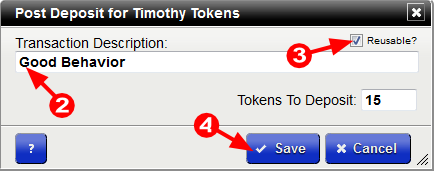 Be descriptive as possible as to the reason why the transaction is being
posted to the participant's account, especially for deposits. This description
is shown to the participant when he or she is viewing account activity at Shop.Token.
Check "Reusable" to
instruct the system to remember the transaction you are currently entering.
The next time you create a transaction for the same reason, you will
only need to type the first couple letters in the description.
The rest of the description and the amount will fill in automatically.
This defaults to being checked.
After you click "Save", notifications are delivered
to valid e-mail addresses for the
participant's family contacts and/or the participant (deposits only).
The transaction will also be
listed on the participant's ledger as demonstrated here:
Be descriptive as possible as to the reason why the transaction is being
posted to the participant's account, especially for deposits. This description
is shown to the participant when he or she is viewing account activity at Shop.Token.
Check "Reusable" to
instruct the system to remember the transaction you are currently entering.
The next time you create a transaction for the same reason, you will
only need to type the first couple letters in the description.
The rest of the description and the amount will fill in automatically.
This defaults to being checked.
After you click "Save", notifications are delivered
to valid e-mail addresses for the
participant's family contacts and/or the participant (deposits only).
The transaction will also be
listed on the participant's ledger as demonstrated here:
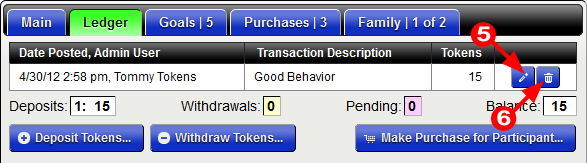 Click the pencil icon to edit a recent transaction's description or token amount.
Click the trash can button to delete a recent transaction or cancel a pending participant order.
Click the pencil icon to edit a recent transaction's description or token amount.
Click the trash can button to delete a recent transaction or cancel a pending participant order.
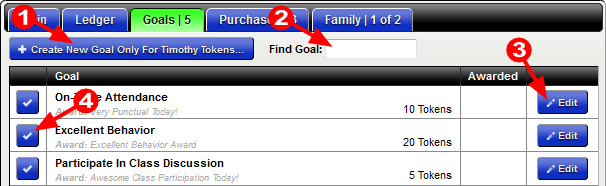 Click the "Create New Goal..." button to create a new goal automatically
defaulted to having only the current participant as eligible to see the goal
and receive its award.
Visit Goals Area > Add & Edit Goals
to learn more about creating goals.
To find a specific goal, type a few letters of the goal name in the
"Find Goal" input. The list of goals will be filtered to those having
those letters.
Edit an existing goal/award for the participant by clicking the pencil icon.
Visit
Goals Area > Add & Edit Goals
to learn more about editing goals.
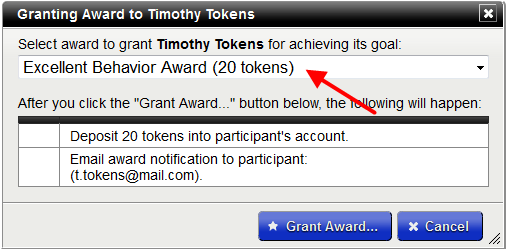
To award the participant for completion or achievement of the goal, click
the checkmark button. The following dialog will appear:
Click the "Create New Goal..." button to create a new goal automatically
defaulted to having only the current participant as eligible to see the goal
and receive its award.
Visit Goals Area > Add & Edit Goals
to learn more about creating goals.
To find a specific goal, type a few letters of the goal name in the
"Find Goal" input. The list of goals will be filtered to those having
those letters.
Edit an existing goal/award for the participant by clicking the pencil icon.
Visit
Goals Area > Add & Edit Goals
to learn more about editing goals.
To award the participant for completion or achievement of the goal, click
the checkmark button. The following dialog will appear:
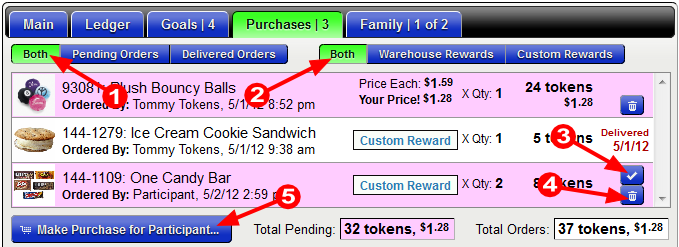 Use these buttons to filter the list of purchases for pending and delivered
purchases.
These buttons allow you to filter the participant's purchases by
the source of the reward, i.e. those provided by the Token Rewards
Warehouse, or your program's Custom Rewards created in
My Shop.
Custom Reward purchases can be marked as "delivered" by clicking the
checkmark button after you've delivered the reward. Rewards fulfilled by
the Token Rewards Warehouse are changed from "pending" to "delivered"
once the item has shipped.
You can cancel any pending reward purchase by
clicking the trash can button.
Warning! Be careful when cancelling
participant orders, there is no undo button!
If computer access is not available for a participant,
click the "Make Purchase for Participant.." button
to redeem their tokens for them.
Clicking the button opens the following dialog:
Use these buttons to filter the list of purchases for pending and delivered
purchases.
These buttons allow you to filter the participant's purchases by
the source of the reward, i.e. those provided by the Token Rewards
Warehouse, or your program's Custom Rewards created in
My Shop.
Custom Reward purchases can be marked as "delivered" by clicking the
checkmark button after you've delivered the reward. Rewards fulfilled by
the Token Rewards Warehouse are changed from "pending" to "delivered"
once the item has shipped.
You can cancel any pending reward purchase by
clicking the trash can button.
Warning! Be careful when cancelling
participant orders, there is no undo button!
If computer access is not available for a participant,
click the "Make Purchase for Participant.." button
to redeem their tokens for them.
Clicking the button opens the following dialog:
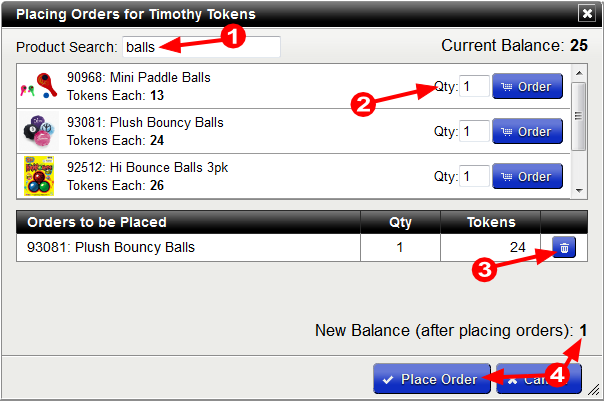 Product Search - enter a few letters of the item name or product code
to be ordered for the participant. Items that meet your search will be displayed.
Adjust the quantity and click the "Order" button. The item will then be placed in the "Orders to be Placed" list.
Click the trash can button if you've selected the wrong item.
It will be removed from the list of "Orders to be Placed".
Before clicking "Place Order", verify the "New Balance" did not go negative,
i.e. make sure the participant has enough tokens for the purchase.
Unlike participant shopping at Shop.Token,
administrators using Admin.Token can make purchases for participants
regardless of their token balance.
Product Search - enter a few letters of the item name or product code
to be ordered for the participant. Items that meet your search will be displayed.
Adjust the quantity and click the "Order" button. The item will then be placed in the "Orders to be Placed" list.
Click the trash can button if you've selected the wrong item.
It will be removed from the list of "Orders to be Placed".
Before clicking "Place Order", verify the "New Balance" did not go negative,
i.e. make sure the participant has enough tokens for the purchase.
Unlike participant shopping at Shop.Token,
administrators using Admin.Token can make purchases for participants
regardless of their token balance.
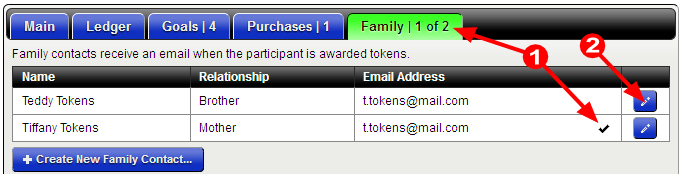 In this example, the participant has two family contacts, one of which
has verified their e-mail address (the check next to the address indicates
it has been confirmed).
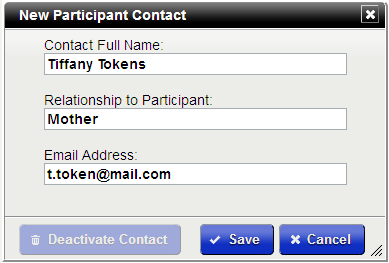
Click the pencil icon to edit a contact's name, relationship, or e-mail address.
In this example, the participant has two family contacts, one of which
has verified their e-mail address (the check next to the address indicates
it has been confirmed).
Click the pencil icon to edit a contact's name, relationship, or e-mail address.
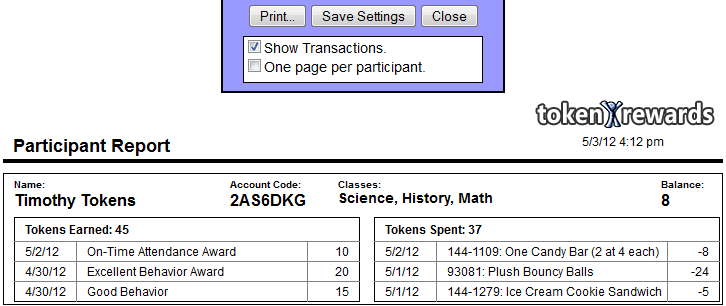
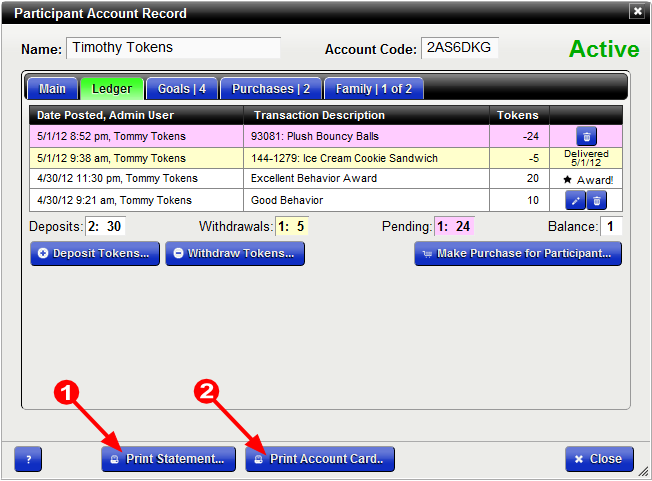 Click "Print Statement..." to open a new tab in your browser and display
the current participant's printable statement as shown below. Toggle the
"Show Transactions" checkbox to hide or show the itemized awards and rewards.
Click "Print Statement..." to open a new tab in your browser and display
the current participant's printable statement as shown below. Toggle the
"Show Transactions" checkbox to hide or show the itemized awards and rewards.
 Click "Print Account Card..." to print an a card like the one shown below.
The cards are
designed to be handed out to participants so they know the
Shop.Token
address as well as their Account Code to log in.
Click "Print Account Card..." to print an a card like the one shown below.
The cards are
designed to be handed out to participants so they know the
Shop.Token
address as well as their Account Code to log in.

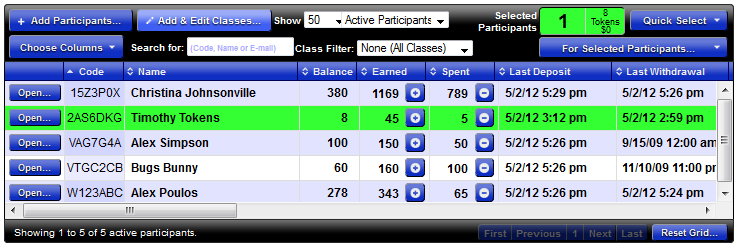
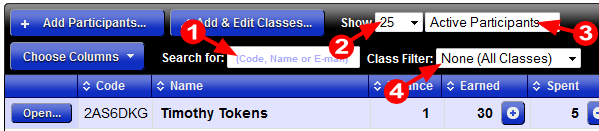 Search for a participant by entering a few letters. This filters the participants down
to only those having the entered sequence of letters in their name, account code or e-mail address.
Note that only participants who are not already filtered out (see items 3 and 4 below) will
be searched.
Select the maximum number of participants to show. If the participant area grid feels to slow,
reduce this number. DO NOT set the value to "All" if you have
more than 300 participants in your program. It will be very, slow to load.
Filter the participants based upon their status. It will default to
"Active Participants". View more about the participant status field under the topic
Edit Participant Info.
Filter the participants to those who have been assigned the selected class.
Class Administrators will only see the classes they have been assigned.
This filter selector is only visible if classes have been created
for your program.
Search for a participant by entering a few letters. This filters the participants down
to only those having the entered sequence of letters in their name, account code or e-mail address.
Note that only participants who are not already filtered out (see items 3 and 4 below) will
be searched.
Select the maximum number of participants to show. If the participant area grid feels to slow,
reduce this number. DO NOT set the value to "All" if you have
more than 300 participants in your program. It will be very, slow to load.
Filter the participants based upon their status. It will default to
"Active Participants". View more about the participant status field under the topic
Edit Participant Info.
Filter the participants to those who have been assigned the selected class.
Class Administrators will only see the classes they have been assigned.
This filter selector is only visible if classes have been created
for your program.
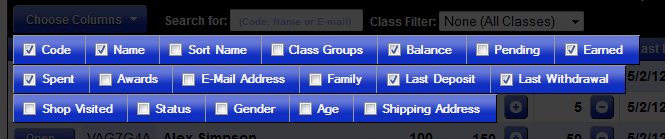
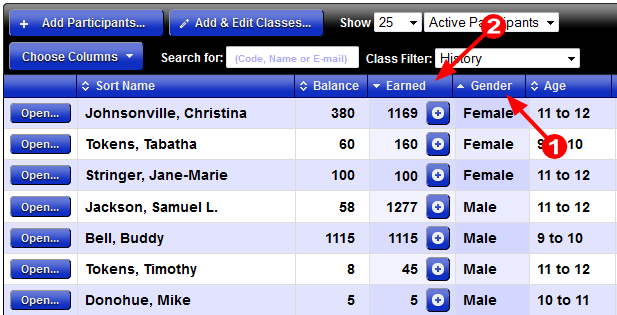
 Click the "Gender" column header first to sort by gender.
Then hold the SHIFT key and click the "Earned" column header.
Click the "Gender" column header first to sort by gender.
Then hold the SHIFT key and click the "Earned" column header.
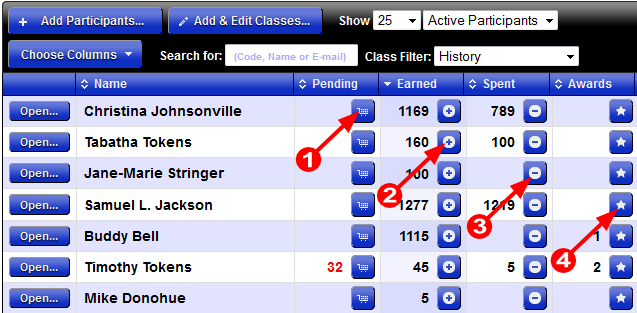 The shopping cart button in the "Pending" column will open the
Place Orders Dialog
so you can make reward purchases for the participant.
The plus sign button in the "Earned" column will open the
Post Deposit Dialog.
The minus sign button in the "Spent" column will open the
Post Withdrawal Dialog.
The star button in the "Awards" column will open the
Grant Award Dialog.
The shopping cart button in the "Pending" column will open the
Place Orders Dialog
so you can make reward purchases for the participant.
The plus sign button in the "Earned" column will open the
Post Deposit Dialog.
The minus sign button in the "Spent" column will open the
Post Withdrawal Dialog.
The star button in the "Awards" column will open the
Grant Award Dialog.
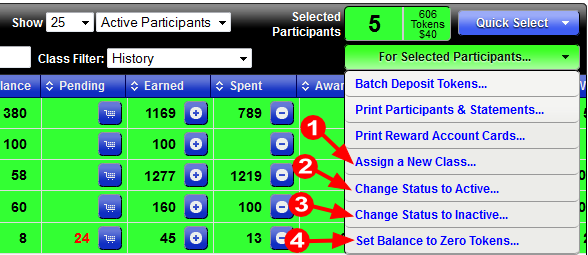
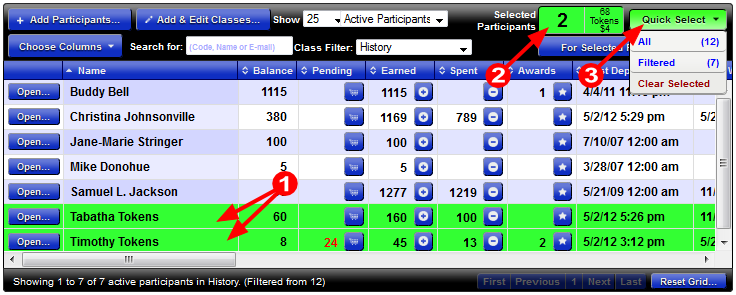 To "Select" a participant, single-click anywhere on the row
(except the shortcut buttons). The row will turn green, indicating the
participant has been "selected". Single-click the row again to deselect
the participant. Select a series of participants by clicking one, then
holding SHIFT and clicking another. All the participants between
the two will also be selected.
As you select/deselect participants, the "Selected Participants" counter
will increase/decrease. The counter also displays the sum of the selected participant's
token balances and the dollar value or balance sum in terms of
your program's exchange rate.
Use the "Quick Select" dropdown button to quickly select all or filtered
sets of the participants. The number on "All" option shows how
many will be selected based on the current setting of the
Status Filter.
The "Filtered" quick-select option selects only those that meet the
"Search For" criteria and the current "Class Filter".
To "Select" a participant, single-click anywhere on the row
(except the shortcut buttons). The row will turn green, indicating the
participant has been "selected". Single-click the row again to deselect
the participant. Select a series of participants by clicking one, then
holding SHIFT and clicking another. All the participants between
the two will also be selected.
As you select/deselect participants, the "Selected Participants" counter
will increase/decrease. The counter also displays the sum of the selected participant's
token balances and the dollar value or balance sum in terms of
your program's exchange rate.
Use the "Quick Select" dropdown button to quickly select all or filtered
sets of the participants. The number on "All" option shows how
many will be selected based on the current setting of the
Status Filter.
The "Filtered" quick-select option selects only those that meet the
"Search For" criteria and the current "Class Filter".
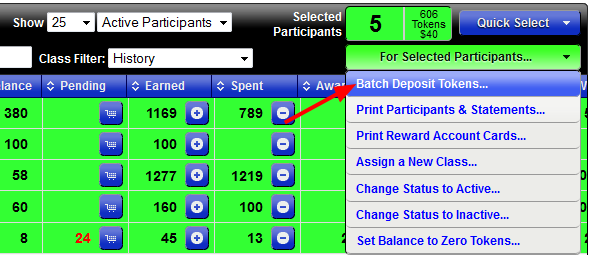
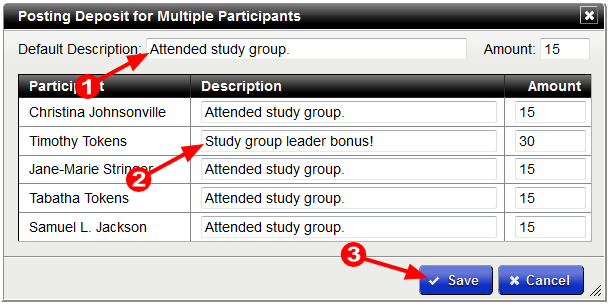 Enter the default description and amount for the batch deposit. As you type,
the values will be transposed next to each participant's name.
Override any of the default values as needed. In this example, Timothy receives
an extra 15 tokens for being the study group leader.
Click the "Save" button when finished. Each of the participant's token balance
will increase by the amount entered and notifications are emailed to the
participants and their family contacts where applicable.
Enter the default description and amount for the batch deposit. As you type,
the values will be transposed next to each participant's name.
Override any of the default values as needed. In this example, Timothy receives
an extra 15 tokens for being the study group leader.
Click the "Save" button when finished. Each of the participant's token balance
will increase by the amount entered and notifications are emailed to the
participants and their family contacts where applicable.
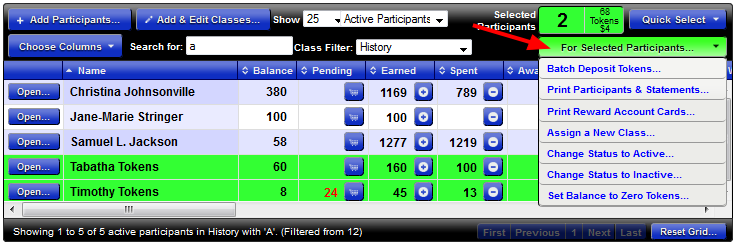
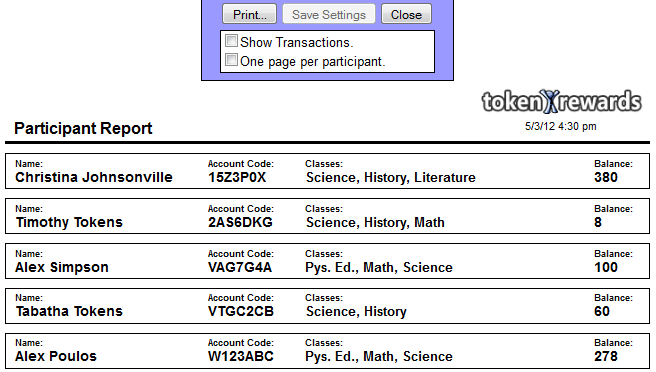
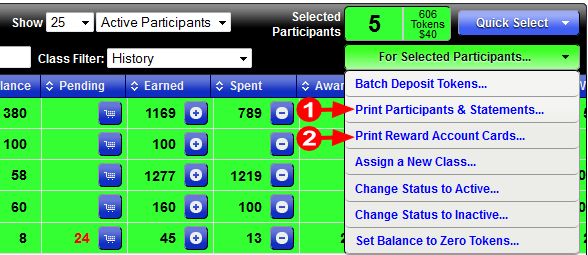 Click the option to "Print Participants & Statements..." to open a new
browser tab with the participant report as shown here.
Check "Show Transactions" and
"One page per participant" to print individual statements that can
be given to your participants.
With both those options
unchecked, it is a simple report of names, codes, classes, and balances.
Click the option to "Print Participants & Statements..." to open a new
browser tab with the participant report as shown here.
Check "Show Transactions" and
"One page per participant" to print individual statements that can
be given to your participants.
With both those options
unchecked, it is a simple report of names, codes, classes, and balances.
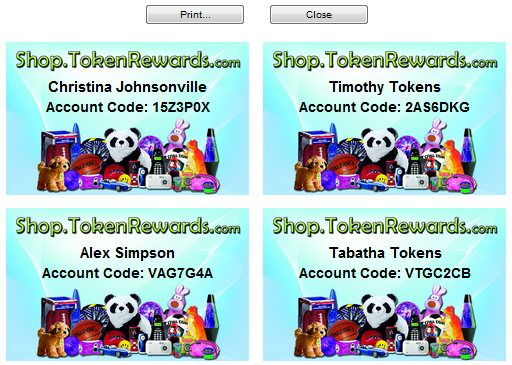
 The option to "Print Reward Account Cards..." opens a new
browser tab showing the account cards for the selected
participants as displayed below. Click the "Print..." button
or choose File > Print from your browser's menu bar.
The option to "Print Reward Account Cards..." opens a new
browser tab showing the account cards for the selected
participants as displayed below. Click the "Print..." button
or choose File > Print from your browser's menu bar.

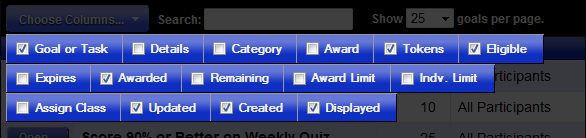
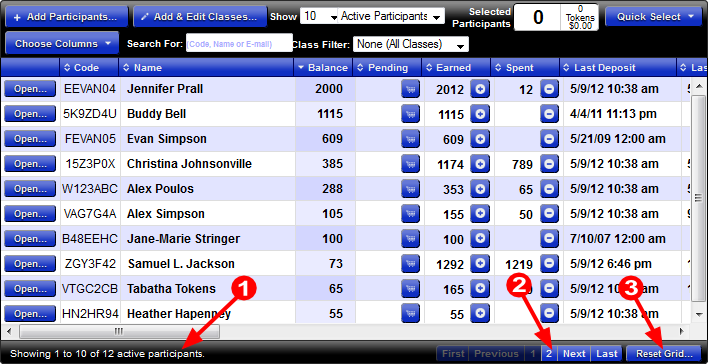 A summary of the displayed participants is shown here. It details which "page"
you are on (see next step), how many filtered participants there are, and the
total number of participants.
When there are more participants than can be displayed in the scrollable area,
you can paginate through the participants using these buttons.
If the participant grid appears to incorrectly
display the columns or rows, this is likely due to a corrupted cookie
stored in your browser's cache (typically IE8 or earlier). Click the "Reset Grid" button
to erase the cookie and redraw the grid. You will have to reselect the
columns you want displayed.
A summary of the displayed participants is shown here. It details which "page"
you are on (see next step), how many filtered participants there are, and the
total number of participants.
When there are more participants than can be displayed in the scrollable area,
you can paginate through the participants using these buttons.
If the participant grid appears to incorrectly
display the columns or rows, this is likely due to a corrupted cookie
stored in your browser's cache (typically IE8 or earlier). Click the "Reset Grid" button
to erase the cookie and redraw the grid. You will have to reselect the
columns you want displayed.

| Goal | Award | Tokens |
|---|---|---|
| On-Time Arrival | Great Punctuality Today! | 15 Tokens |
| Brush Teeth Daily | Teeth Brushed Today! | 20 Tokens |
| Score 90%+ on Weekly Quiz | Aced That Quiz Award! | 100 Tokens |
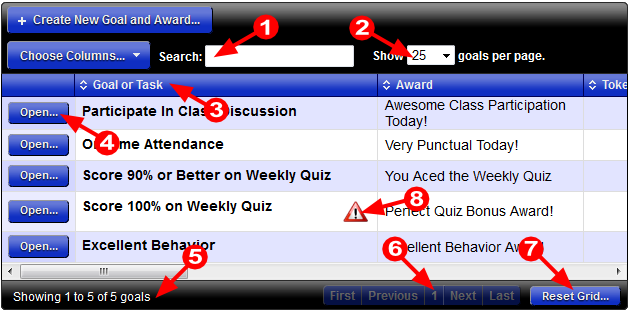 Search for a goal by entering a few letters. This filters the goals down
to only those having the entered sequence of letters in the goal name, description,
category, or award title.
Select the maximum number of goals to show. If the grid feels slow,
reduce this number. DO NOT set the value to "All" if you have
more than 300 goals in your program. It will be very, slow to load.
Sort or rank your goals by clicking the header of the column.
The arrows to the left of the column header name
indicate which direction the column is sorted. Up means ascending, down is descending
and an up/down arrow means the column is unsorted.
Click the "Open..." button to open the Goal Window for that goal.
You may also double-click anywhere on the row to do the same.
A summary of the displayed goals is shown at the bottom of the grid.
It details which "page"
you are on (see next step), how many filtered goals there are, and the
total number of goals.
When there are more goals than can be displayed in the scrollable area,
you can paginate through the goals using these buttons.
If the grid appears to incorrectly
display the columns or rows, this is likely due to a corrupted cookie
stored in your browser's cache (typically IE8 or earlier). Click the "Reset Grid" button
to erase the cookie and redraw the grid. You will have to reselect the
columns you want displayed.
A warning sign on a goal title indicates that the goal is not being displayed
at Shop.Token for any number of reasons. Hover your mouse
over the symbol to quickly see why it's not displayed.
Search for a goal by entering a few letters. This filters the goals down
to only those having the entered sequence of letters in the goal name, description,
category, or award title.
Select the maximum number of goals to show. If the grid feels slow,
reduce this number. DO NOT set the value to "All" if you have
more than 300 goals in your program. It will be very, slow to load.
Sort or rank your goals by clicking the header of the column.
The arrows to the left of the column header name
indicate which direction the column is sorted. Up means ascending, down is descending
and an up/down arrow means the column is unsorted.
Click the "Open..." button to open the Goal Window for that goal.
You may also double-click anywhere on the row to do the same.
A summary of the displayed goals is shown at the bottom of the grid.
It details which "page"
you are on (see next step), how many filtered goals there are, and the
total number of goals.
When there are more goals than can be displayed in the scrollable area,
you can paginate through the goals using these buttons.
If the grid appears to incorrectly
display the columns or rows, this is likely due to a corrupted cookie
stored in your browser's cache (typically IE8 or earlier). Click the "Reset Grid" button
to erase the cookie and redraw the grid. You will have to reselect the
columns you want displayed.
A warning sign on a goal title indicates that the goal is not being displayed
at Shop.Token for any number of reasons. Hover your mouse
over the symbol to quickly see why it's not displayed.

 Goal or Task Title - This is the only required data to save the record.
Try to keep it under 60 characters, but it can be up to 1000.
You can optionally enter any details about this goal in the "Details" input.
As you type, the Goal Preview is updated (see item #8).
Tokens to be Earned - The number of tokens to be
deposited into a participant's account when an award is granted
for achievement of this goal.
Its value must be at least one token.
Category - Categorize your goals to help organize them for you
and your participants, especially when you have more than 20.
Press the down-arrow key or type a few letters to show a
list of previously used categories.
Deadline - Placing a check here will show a date input field
where you can enter an expiration date for the goal. Prior to the
deadline, participants will see that it "Expires" when viewing the goal
at Shop.Token.
After the deadline, the goal will no longer be visible at Shop.Token
for participants and on the
Participant Window > Goals Tab
for administrators.
Limit Awards per Participant - After checking this, you are
given an input to enter the maximum number of awards any one participant
may receive for this goal. Once the participant has reached this limit,
the goal is no longer displayed for him or her at Shop.Token and it
is removed from the list of awardable goals on the
Participant Window > Goals Tab.
Limit Total Awards Available - Check this to enter the total
number of awards than can be granted for this goal. Once that number
of awards has been reached, the goal is no longer displayed for any participants
at Shop.Token. Useful for "competition" type goals (e.g. First Place in Writing Contest).
Do Not Show Goal To Participants - Use this option when either drafting a new
goal or for goals that participants should not currently see.
You can still grant awards for the goal on the
Participant Window > Goals Tab.
Goal Preview - Shows exactly how the goal appears for participants
at Shop.Token.
Save Button - Will enable if any changes are detected and
the "Goal or Task Title" (item #1) has been entered. Unlike most other
dialogs in Admin.Token, the window does not close after saving so
you can make further edits to the goal if needed.
If the Goal Window does not fit entirely in your browser, try
making your browser "full-screen" by pressing the F11 key. Press the
F11 again to resume normal browsing. You can also zoom in/out
by pressing CTRL +/- (that's holding Ctrl key while pressing the Plus or Minus key).
Press CTRL+0 to resume normal zoom. These tricks work best in modern browsers only.
Goal or Task Title - This is the only required data to save the record.
Try to keep it under 60 characters, but it can be up to 1000.
You can optionally enter any details about this goal in the "Details" input.
As you type, the Goal Preview is updated (see item #8).
Tokens to be Earned - The number of tokens to be
deposited into a participant's account when an award is granted
for achievement of this goal.
Its value must be at least one token.
Category - Categorize your goals to help organize them for you
and your participants, especially when you have more than 20.
Press the down-arrow key or type a few letters to show a
list of previously used categories.
Deadline - Placing a check here will show a date input field
where you can enter an expiration date for the goal. Prior to the
deadline, participants will see that it "Expires" when viewing the goal
at Shop.Token.
After the deadline, the goal will no longer be visible at Shop.Token
for participants and on the
Participant Window > Goals Tab
for administrators.
Limit Awards per Participant - After checking this, you are
given an input to enter the maximum number of awards any one participant
may receive for this goal. Once the participant has reached this limit,
the goal is no longer displayed for him or her at Shop.Token and it
is removed from the list of awardable goals on the
Participant Window > Goals Tab.
Limit Total Awards Available - Check this to enter the total
number of awards than can be granted for this goal. Once that number
of awards has been reached, the goal is no longer displayed for any participants
at Shop.Token. Useful for "competition" type goals (e.g. First Place in Writing Contest).
Do Not Show Goal To Participants - Use this option when either drafting a new
goal or for goals that participants should not currently see.
You can still grant awards for the goal on the
Participant Window > Goals Tab.
Goal Preview - Shows exactly how the goal appears for participants
at Shop.Token.
Save Button - Will enable if any changes are detected and
the "Goal or Task Title" (item #1) has been entered. Unlike most other
dialogs in Admin.Token, the window does not close after saving so
you can make further edits to the goal if needed.
If the Goal Window does not fit entirely in your browser, try
making your browser "full-screen" by pressing the F11 key. Press the
F11 again to resume normal browsing. You can also zoom in/out
by pressing CTRL +/- (that's holding Ctrl key while pressing the Plus or Minus key).
Press CTRL+0 to resume normal zoom. These tricks work best in modern browsers only.
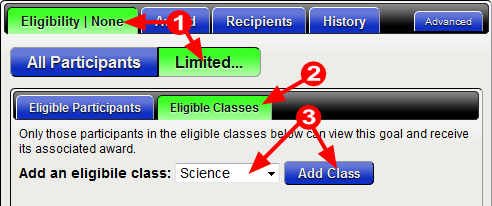
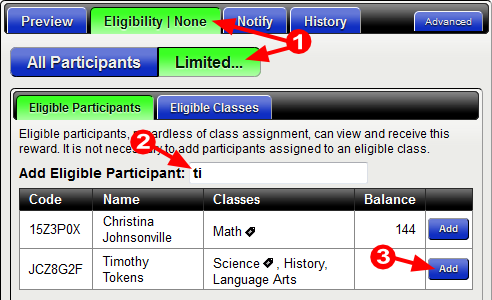
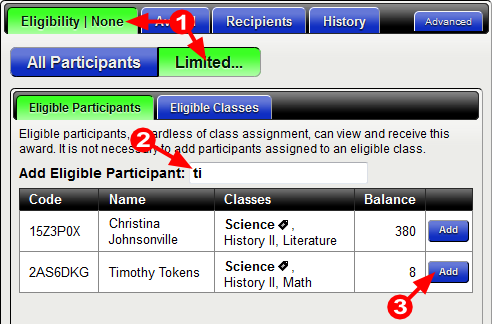 Select the goal's "Eligibility" tab and
toggle the general eligibility from "All Participants" to "Limited...".
Notice the word "None" in the tab title after clicking "Limited".
This means that the goal/award is limited to nobody.
Enter a few letters of the participant's name or account code. A list
of participants fitting the search will be displayed.
Click the "Add" button for the correct participant.
Select the goal's "Eligibility" tab and
toggle the general eligibility from "All Participants" to "Limited...".
Notice the word "None" in the tab title after clicking "Limited".
This means that the goal/award is limited to nobody.
Enter a few letters of the participant's name or account code. A list
of participants fitting the search will be displayed.
Click the "Add" button for the correct participant.
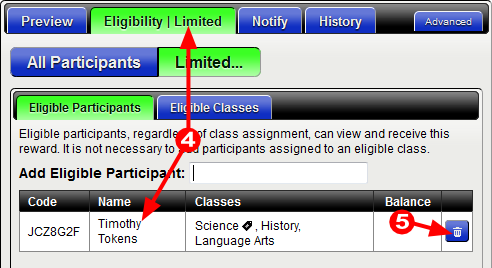
 The participant is then added to the list of eligible participants. Notice
the tab at the top now states "Eligibility | Limited".
To remove a participant from the list of eligible participants,
click the trash can icon.
For a shortcut, you can also create a new goal whose eligibility
is limited to a single participant by clicking the "Create New Goal..."
button on the
Participant Window > Goals Tab.
The participant is then added to the list of eligible participants. Notice
the tab at the top now states "Eligibility | Limited".
To remove a participant from the list of eligible participants,
click the trash can icon.
For a shortcut, you can also create a new goal whose eligibility
is limited to a single participant by clicking the "Create New Goal..."
button on the
Participant Window > Goals Tab.
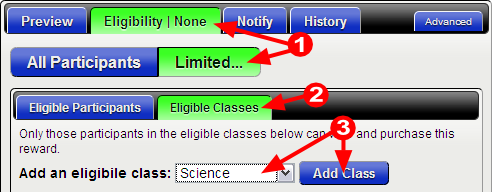
 Select the goal's "Eligibility" tab and
toggle the general eligibility from "All Participants" to "Limited...".
Notice the word "None" in the tab title after clicking "Limited".
This means that the goal/award is limited to nobody.
Select the "Eligible Classes" sub-tab to add, edit and view the goal's
eligible classes.
From the dropdown selector, choose the class to be eligible for the goal/award,
then click the "Add Class" button that appears after a class is selected.
Select the goal's "Eligibility" tab and
toggle the general eligibility from "All Participants" to "Limited...".
Notice the word "None" in the tab title after clicking "Limited".
This means that the goal/award is limited to nobody.
Select the "Eligible Classes" sub-tab to add, edit and view the goal's
eligible classes.
From the dropdown selector, choose the class to be eligible for the goal/award,
then click the "Add Class" button that appears after a class is selected.
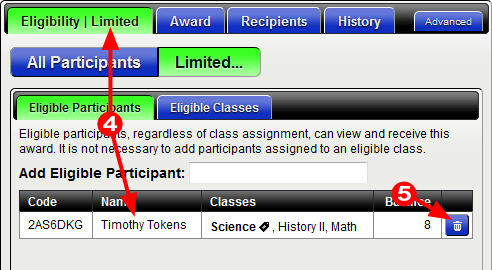
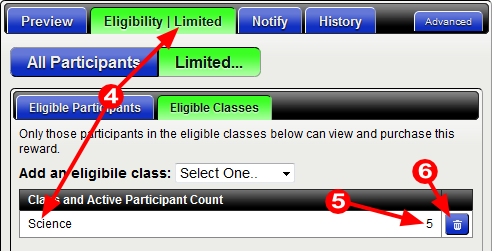
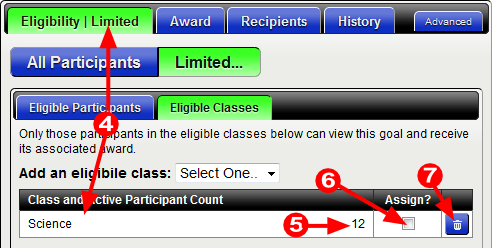 The class is then added to the list of eligible classes for the goal. Notice
the tab at the top now states "Eligibility | Limited".
This number represents the active participant count for the class,
showing you exactly how many participants are eligible for the goal/award
because they have been assigned to the class.
When using printed "Admission Certificates" for this goal/award,
checking the "Assign" checkbox
will automatically assign new participants to the class who create
their accounts at Shop.Token using the certificates. Learn more about
using Admission Certificates
under the topic Currency Wizard.
Click the trash can button to remove the class from the list of
goal's eligible classes.
The class is then added to the list of eligible classes for the goal. Notice
the tab at the top now states "Eligibility | Limited".
This number represents the active participant count for the class,
showing you exactly how many participants are eligible for the goal/award
because they have been assigned to the class.
When using printed "Admission Certificates" for this goal/award,
checking the "Assign" checkbox
will automatically assign new participants to the class who create
their accounts at Shop.Token using the certificates. Learn more about
using Admission Certificates
under the topic Currency Wizard.
Click the trash can button to remove the class from the list of
goal's eligible classes.
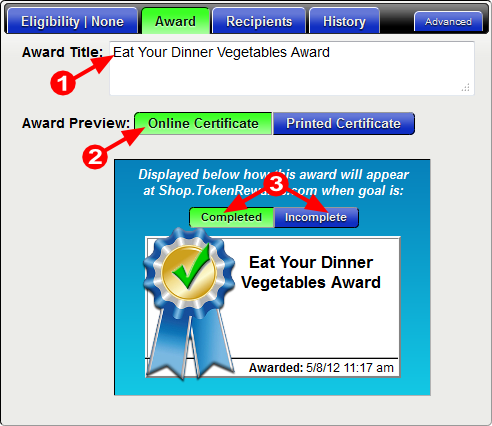 By default, the "Award Title" will automatically be created as you type the
"Goal or Task Title". It will be the same text except the word
"Award" is appended to the end. This is simply a shortcut when creating the
goal. You can overwrite this default value with something
more fitting and exciting.
In this example, the goal title is "Eat Your Dinner Vegetables" making the
default award title "Eat Your Dinner Vegetables Award".
A better award title could be "Good job eating your vegetables at dinner!".
Or you can get fun and creative with "You're a Green Eating Machine! Awesome!"
(see item #4).
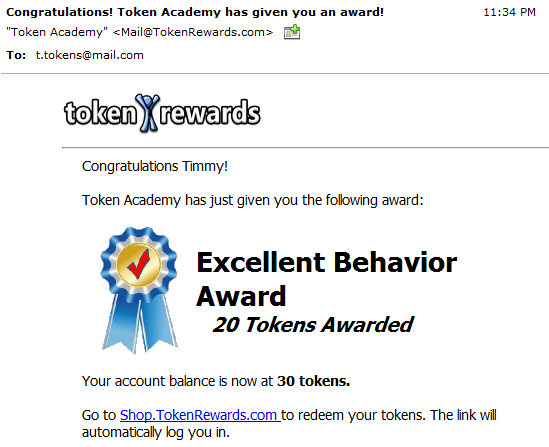
When you've granted the award for the goal, the "Award Title" is used
for the deposit entry on the participant's ledger and in the award notifications
emailed to the participant and his/her family contacts.
Toggle the Award Preview to "Online" to see how the award is displayed
for participants at Shop.Token in their "Awards" area.
The Online Certificate has different states of appearance, depending on
if the viewing participant has been granted the award and how many
times he or has received it. Use these buttons to toggle between
the states.
By default, the "Award Title" will automatically be created as you type the
"Goal or Task Title". It will be the same text except the word
"Award" is appended to the end. This is simply a shortcut when creating the
goal. You can overwrite this default value with something
more fitting and exciting.
In this example, the goal title is "Eat Your Dinner Vegetables" making the
default award title "Eat Your Dinner Vegetables Award".
A better award title could be "Good job eating your vegetables at dinner!".
Or you can get fun and creative with "You're a Green Eating Machine! Awesome!"
(see item #4).
When you've granted the award for the goal, the "Award Title" is used
for the deposit entry on the participant's ledger and in the award notifications
emailed to the participant and his/her family contacts.
Toggle the Award Preview to "Online" to see how the award is displayed
for participants at Shop.Token in their "Awards" area.
The Online Certificate has different states of appearance, depending on
if the viewing participant has been granted the award and how many
times he or has received it. Use these buttons to toggle between
the states.
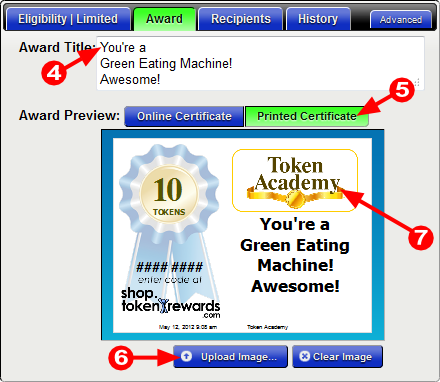 The example above shows a new award title entered for this goal.
Toggle the Award Preview to show the goal's printed award certificate.
Click here to upload your reward program's logo to be used on printed certificates.
The button will open your browser's "File Upload" dialog where you can
select an image file from your computer's file system.
Use any image file type (.jpeg, .png, .gif, etc.).
For optimal appearance, try
using an image that's 400x200 pixels in the .png format.
The image size can go larger and smaller,
but try to keep the 2x1 ratio of width to height.
Once the logo file is uploaded,
it should appear in the certificate preview and on certificates
printed using the
Currency Wizard.
The example above shows a new award title entered for this goal.
Toggle the Award Preview to show the goal's printed award certificate.
Click here to upload your reward program's logo to be used on printed certificates.
The button will open your browser's "File Upload" dialog where you can
select an image file from your computer's file system.
Use any image file type (.jpeg, .png, .gif, etc.).
For optimal appearance, try
using an image that's 400x200 pixels in the .png format.
The image size can go larger and smaller,
but try to keep the 2x1 ratio of width to height.
Once the logo file is uploaded,
it should appear in the certificate preview and on certificates
printed using the
Currency Wizard.
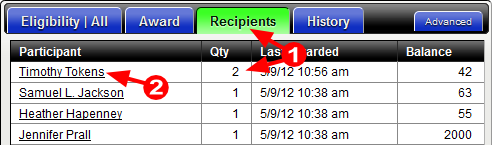
 The Recipients tab of the Goal Window shows which participants have been
granted awards for the goal. The participants are listed in descending order
of when they last received the award (most recent recipient first).
It also shows the quantity of awards each participant has received.
Click a participants's name to open his or her
Participant Window.
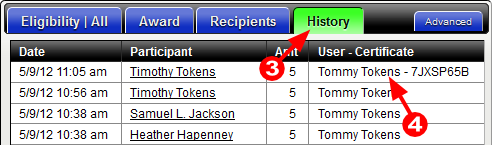
The History tab of the Goal Window lists in reverse chronological order
each time the award was granted.
This column shows the user that granted the award to the participant.
If the participant redeemed a code from a printed award certificate
at Shop.Token, the user who generated the code along with the code redeemed
are displayed here.
The Recipients tab of the Goal Window shows which participants have been
granted awards for the goal. The participants are listed in descending order
of when they last received the award (most recent recipient first).
It also shows the quantity of awards each participant has received.
Click a participants's name to open his or her
Participant Window.
The History tab of the Goal Window lists in reverse chronological order
each time the award was granted.
This column shows the user that granted the award to the participant.
If the participant redeemed a code from a printed award certificate
at Shop.Token, the user who generated the code along with the code redeemed
are displayed here.
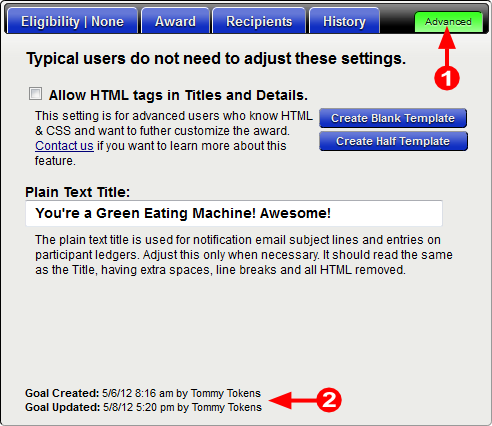 The Goal Window's Advanced tab is for users who want to further
customize the display of the goal and award.
You can also see when and by who the goal was created and last edited here.
If it says "Unknown User", that means the person who created or edited the
goal had logged into Admin.Token using the account's legacy "User Code"
as opposed to their e-mail address.
The Goal Window's Advanced tab is for users who want to further
customize the display of the goal and award.
You can also see when and by who the goal was created and last edited here.
If it says "Unknown User", that means the person who created or edited the
goal had logged into Admin.Token using the account's legacy "User Code"
as opposed to their e-mail address.


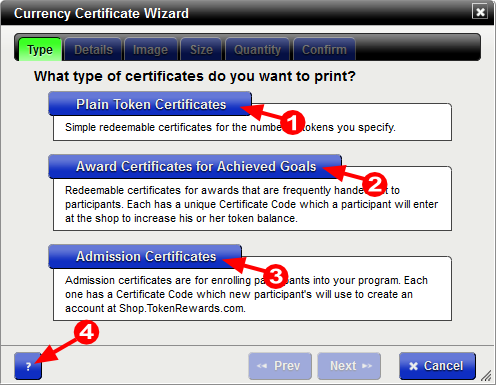 Plain Token Certificates. Use these as a quick and easy way to award
a participant tokens for any arbitrary or miscellaneous reason.
Note that "Token Academy" is the name of the reward program used for these example certificates.
Plain Token Certificates. Use these as a quick and easy way to award
a participant tokens for any arbitrary or miscellaneous reason.
Note that "Token Academy" is the name of the reward program used for these example certificates.
 Award Certificates. These are best for recognizing specific
goals or tasks that have been achieved or completed. This example
shows an award certificate for the "On-Time Attendance" goal created for Token Academy.
Award Certificates. These are best for recognizing specific
goals or tasks that have been achieved or completed. This example
shows an award certificate for the "On-Time Attendance" goal created for Token Academy.
 Admission Certificates. Very similar to Award Certificates in that
they recognize the specific goal of "Creating a new account" and
are intended to be given to participants who do not yet have a Shop.Token account.
Admission Certificates. Very similar to Award Certificates in that
they recognize the specific goal of "Creating a new account" and
are intended to be given to participants who do not yet have a Shop.Token account.
 Click the question mark to open the Admin.Token User Guide to this topic.
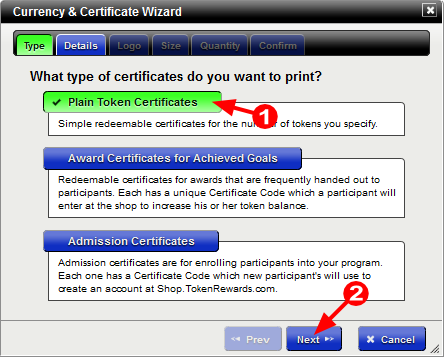 Select the "Plain Token Certificates" option on the first tab of the Wizard.
Click the "Next" button to open the second tab, "Details".
Select the "Plain Token Certificates" option on the first tab of the Wizard.
Click the "Next" button to open the second tab, "Details".
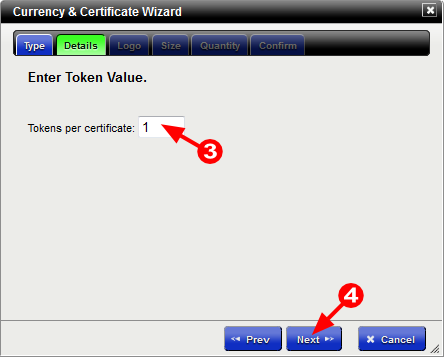 Enter the value, in tokens, that the certificates you're about print are worth.
Click "Next" to proceed onto entering the rest of your preferences about
the certificates (image, size, quantity, etc.) and generate the codes.
Enter the value, in tokens, that the certificates you're about print are worth.
Click "Next" to proceed onto entering the rest of your preferences about
the certificates (image, size, quantity, etc.) and generate the codes.
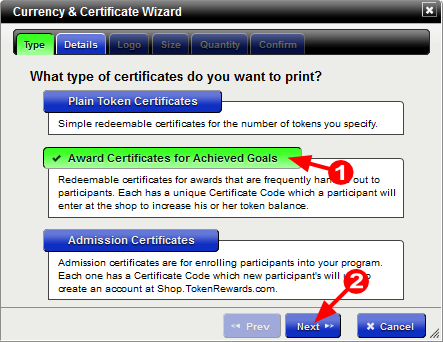 Select the "Award Certificates..." option on the first tab of the Wizard.
Click the "Next" button to open the second tab, "Details".
Select the "Award Certificates..." option on the first tab of the Wizard.
Click the "Next" button to open the second tab, "Details".
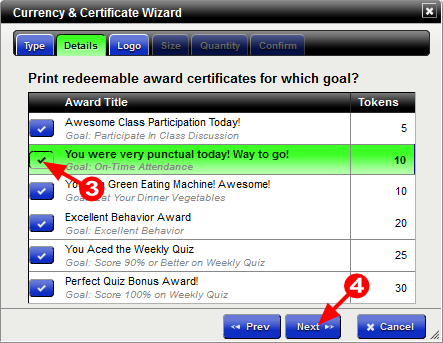 Click which award/goal you want to create.
You can only generate and print certificates for one goal/award at a time.
Click "Next" to proceed onto entering the rest of your preferences about
the certificates (image, size, quantity, etc.) and generate the codes.
Click which award/goal you want to create.
You can only generate and print certificates for one goal/award at a time.
Click "Next" to proceed onto entering the rest of your preferences about
the certificates (image, size, quantity, etc.) and generate the codes.
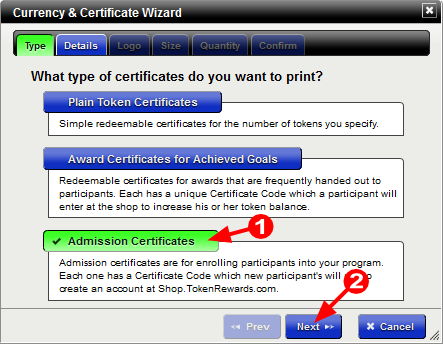 Select the "Admission Certificates" option on the first tab of the Currency Wizard.
Click the "Next" button to open the second tab, "Details".
Select the "Admission Certificates" option on the first tab of the Currency Wizard.
Click the "Next" button to open the second tab, "Details".
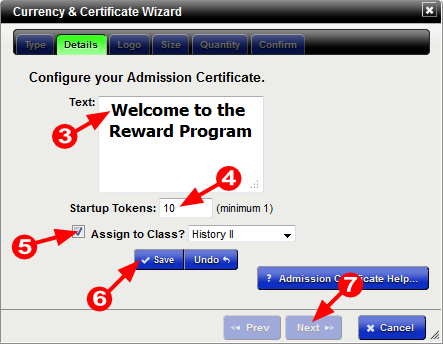 Enter the text you want displayed on the admission certificates.
As you type, the certificate to be printed is updated on the screen,
behind the Currency Wizard window. Note that what you type will also
be recorded on the participant's ledger as the transaction description
for the first deposit.
Enter the number of tokens to be given to the participant
(deposit recorded onto his/her ledger)
after creating his or her new account with the admission certificate.
It is recommended you set this amount to be at or over your lowest priced
reward at Shop.Token so participants may immediately begin shopping.
If you have created participant classes for your reward program,
check this to assign newly created participant accounts via
this admission certificate to the selected class. Notice the "Assign Class"
is written in very small print across the bottom edge of the printed certificates.
Save or undo any changes made to the admission certificate.
The "Next" button will enable only if all changes made to the admission
certificate have been saved. Click to proceed onto entering the rest
of your preferences about
the certificates (image, size, quantity, etc.) and generate the codes.
The admission certificate is really just another goal & award. When you return
to the Goals Area, there will be a new goal titled "Admission Certificate Goal".
You can open and edit this goal just like any other goal. The text entered above
in item #3 is the really the goal's "Award Title" on its "Award" tab.
When the "Admission Certificate Goal" is created, it is limited to 1 award per participant,
has the category "New Participants" assigned,
and is set to not be displayed as a goal at Shop.Token.
It is not displayed so as to not be confused with
actual goals assigned to participants.
If you delete this goal, you will lose any changes made to the
default admission certificate while using in the Currency Wizard.
Lastly, note that any certificate's code can be used to
create a new participant account for
your reward program at Shop.Token, you don't necessarily need to use
Admission Certificates. Participants can just as easily create an account with the
Plain Token Certificates and/or Award Certificates.
Enter the text you want displayed on the admission certificates.
As you type, the certificate to be printed is updated on the screen,
behind the Currency Wizard window. Note that what you type will also
be recorded on the participant's ledger as the transaction description
for the first deposit.
Enter the number of tokens to be given to the participant
(deposit recorded onto his/her ledger)
after creating his or her new account with the admission certificate.
It is recommended you set this amount to be at or over your lowest priced
reward at Shop.Token so participants may immediately begin shopping.
If you have created participant classes for your reward program,
check this to assign newly created participant accounts via
this admission certificate to the selected class. Notice the "Assign Class"
is written in very small print across the bottom edge of the printed certificates.
Save or undo any changes made to the admission certificate.
The "Next" button will enable only if all changes made to the admission
certificate have been saved. Click to proceed onto entering the rest
of your preferences about
the certificates (image, size, quantity, etc.) and generate the codes.
The admission certificate is really just another goal & award. When you return
to the Goals Area, there will be a new goal titled "Admission Certificate Goal".
You can open and edit this goal just like any other goal. The text entered above
in item #3 is the really the goal's "Award Title" on its "Award" tab.
When the "Admission Certificate Goal" is created, it is limited to 1 award per participant,
has the category "New Participants" assigned,
and is set to not be displayed as a goal at Shop.Token.
It is not displayed so as to not be confused with
actual goals assigned to participants.
If you delete this goal, you will lose any changes made to the
default admission certificate while using in the Currency Wizard.
Lastly, note that any certificate's code can be used to
create a new participant account for
your reward program at Shop.Token, you don't necessarily need to use
Admission Certificates. Participants can just as easily create an account with the
Plain Token Certificates and/or Award Certificates.
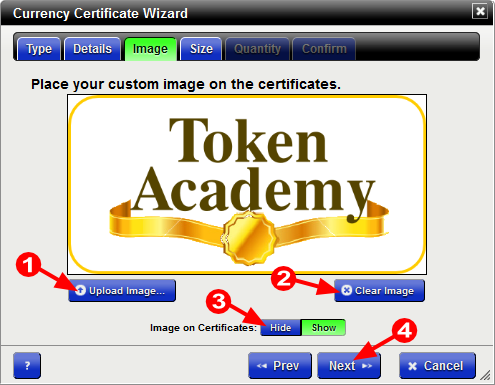 Click here to upload the image file for the printed certificates.
The button will open your browser's "File Upload" dialog where you can
select an image file from your computer's file system.
Use any image file type (.jpeg, .png, .gif, etc.).
For optimal appearance, try
using an image that's 400x200 pixels in the .png format.
The image size can go larger and smaller,
but try to keep the 2x1 ratio of width to height.
The "Clear Image" button will remove the image
and revert to showing your reward program's name on the certificates.
Toggle the display of the uploaded image with these buttons. Hiding
the image will show your reward program's name in its place.
Click "Next" to proceed onto selecting
the size and then quantity of certificates.
Click here to upload the image file for the printed certificates.
The button will open your browser's "File Upload" dialog where you can
select an image file from your computer's file system.
Use any image file type (.jpeg, .png, .gif, etc.).
For optimal appearance, try
using an image that's 400x200 pixels in the .png format.
The image size can go larger and smaller,
but try to keep the 2x1 ratio of width to height.
The "Clear Image" button will remove the image
and revert to showing your reward program's name on the certificates.
Toggle the display of the uploaded image with these buttons. Hiding
the image will show your reward program's name in its place.
Click "Next" to proceed onto selecting
the size and then quantity of certificates.
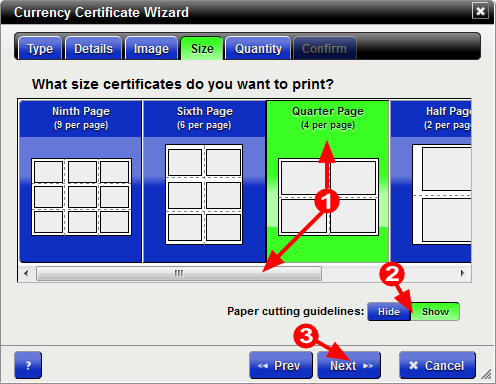 Click the tile which represents size
and how many certificates fit on each printed page.
Use the scrollbar at bottom to reveal the "Full Page" option.
The "Paper Cutting Guidelines" are useful when separating your
certificates. Without the guidelines, it can be difficult
cutting the certificates out into equal sizes with equal margins.
Click the "Next" button to move the next tab where you
set the number of pages, or total quantity of certificates to print.
Click the tile which represents size
and how many certificates fit on each printed page.
Use the scrollbar at bottom to reveal the "Full Page" option.
The "Paper Cutting Guidelines" are useful when separating your
certificates. Without the guidelines, it can be difficult
cutting the certificates out into equal sizes with equal margins.
Click the "Next" button to move the next tab where you
set the number of pages, or total quantity of certificates to print.
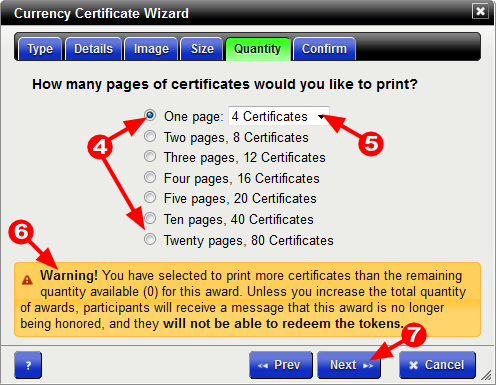 Click the radio button which corresponds to the number of pages and
certificates you want to print.
When printing just one page, you can optionally reduce the quantity
of certificates on that page, in case you only need one or two
smaller certificates.
This warning will only appear when you have limited the total
awards for the particular goal that you're currently printing
certificates and the quantity of certificates selected is greater
than the total awards available. See
Add & Edit Goals to learn more about limiting
the number of awards per goal.
Click the "Next" button to move the next tab where you
confirm your settings and generate the redeemable codes.
Click the radio button which corresponds to the number of pages and
certificates you want to print.
When printing just one page, you can optionally reduce the quantity
of certificates on that page, in case you only need one or two
smaller certificates.
This warning will only appear when you have limited the total
awards for the particular goal that you're currently printing
certificates and the quantity of certificates selected is greater
than the total awards available. See
Add & Edit Goals to learn more about limiting
the number of awards per goal.
Click the "Next" button to move the next tab where you
confirm your settings and generate the redeemable codes.
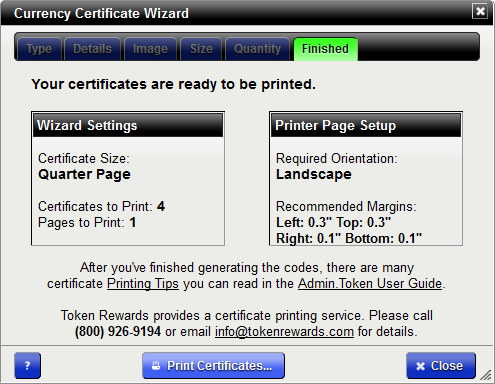
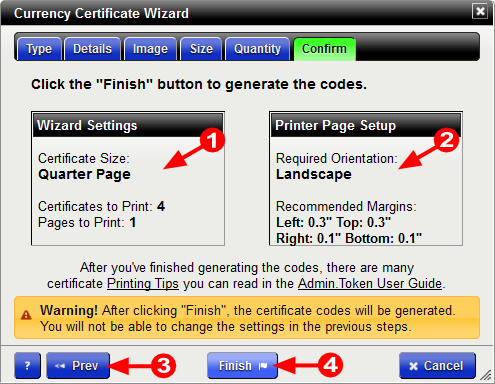 The quantity and size of your certificates to be printed are shown here
for confirmation. If you need to change either, return to
the previous tab(s) using the "Prev" button (item #3).
The required page orientation is prominently displayed here
to remind you how it should be set when printing.
If there are any changes to certificates
you want to make before
generating the certificate codes, you must make them first. Use this
button to return to the previous steps in the wizard.
After clicking the "Finish" button, each certificate's code will replace
the "#### ####" on the certificates to be printed which are
displayed underneath the Currency Wizard.
The "Finish" button will change to "Print Certificates" and the "Prev" button
in item #3 disappears.
Click this button, set the correct page orientation, and if this is your
first time printing, only print one test page.
The next topic covers many printing tips for optimizing the
appearance of the printed certificates.
The quantity and size of your certificates to be printed are shown here
for confirmation. If you need to change either, return to
the previous tab(s) using the "Prev" button (item #3).
The required page orientation is prominently displayed here
to remind you how it should be set when printing.
If there are any changes to certificates
you want to make before
generating the certificate codes, you must make them first. Use this
button to return to the previous steps in the wizard.
After clicking the "Finish" button, each certificate's code will replace
the "#### ####" on the certificates to be printed which are
displayed underneath the Currency Wizard.
The "Finish" button will change to "Print Certificates" and the "Prev" button
in item #3 disappears.
Click this button, set the correct page orientation, and if this is your
first time printing, only print one test page.
The next topic covers many printing tips for optimizing the
appearance of the printed certificates.

 Click this button to create a new Custom Reward.
The Custom Reward Window will open with
all the values set to empty or default values.
Click this button to create a new Custom Reward.
The Custom Reward Window will open with
all the values set to empty or default values.
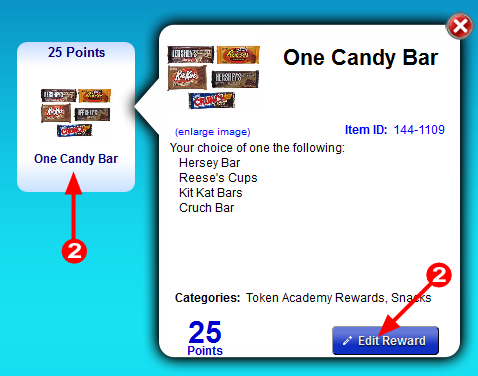 To edit an existing Custom Reward, click the reward to open its "pop-up" details.
Then click the "Edit Reward" button to open the
Custom Reward Window.
Note the "Edit Reward" button appears only for Custom Rewards and not
Warehouse Rewards.
To edit an existing Custom Reward, click the reward to open its "pop-up" details.
Then click the "Edit Reward" button to open the
Custom Reward Window.
Note the "Edit Reward" button appears only for Custom Rewards and not
Warehouse Rewards.
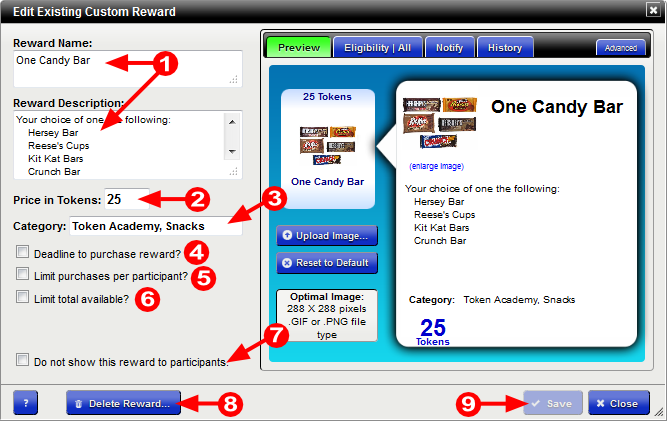 Reward Name and Description - This is the only required data to save.
Try to keep it under 60 characters, but it can be up to 1000.
You can optionally enter a more detailed description about the reward.
As you type, the Preview tab is updated so you will see how the reward will appear
to eligible participants.
Price in Tokens - The number of tokens to be
deducted from a participant's account when the reward is purchased.
Its value must be at least one token.
Category - Enter the category name the custom reward should be grouped by.
If the reward item belongs to multiple categories, separate each category
name with a comma.
Try to keep the category names short and simple.
Deadline - Placing a check here will show a date input field
where you can enter a deadline for purchasing the reward.
After the deadline, the reward will no longer be displayed at
Shop.Token.
Limit Purchases per Participant - After checking this, you are
given an input to enter the maximum number of purchases any one participant
may make for this reward. Once the participant has reached this limit,
the reward is no longer displayed for him or her at
Shop.Token.
Limit Total Available - Check this to enter the total quantity
available for participants to purchase. You may enter a top limit
or update quantity you have on hand.
The "Remaining QOH" value will
automatically be lowered when items are purchased your participants.
Once quantity on hand is reduced to zero,
the reward will no longer be displayed at
Shop.Token.
This is useful for managing a limited inventory of a tangible rewards.
Do Not Show Reward To Participants - Use this option when either drafting a new
reward or for rewards participants should not see.
You can still make purchases of the reward for participants on the
Participant Window > Purchases Tab.
Delete Reward - Click this button to permanently delete the reward. Be careful
when using this feature because it is not undoable. Also note, after a custom reward
is deleted, you will not be able to retrieve any historical statistics about the reward
as displayed on the "History" tab. The "Delete Reward" is only visible
when their are no pending edits to the reward (it has been saved).
Save Button - This button will become enable if any changes are detected and
the "Reward Name" (item #1) has been entered. Unlike most other
dialogs in Admin.Token, the window does not close after saving so
you can make further edits to the reward if needed.
Reward Name and Description - This is the only required data to save.
Try to keep it under 60 characters, but it can be up to 1000.
You can optionally enter a more detailed description about the reward.
As you type, the Preview tab is updated so you will see how the reward will appear
to eligible participants.
Price in Tokens - The number of tokens to be
deducted from a participant's account when the reward is purchased.
Its value must be at least one token.
Category - Enter the category name the custom reward should be grouped by.
If the reward item belongs to multiple categories, separate each category
name with a comma.
Try to keep the category names short and simple.
Deadline - Placing a check here will show a date input field
where you can enter a deadline for purchasing the reward.
After the deadline, the reward will no longer be displayed at
Shop.Token.
Limit Purchases per Participant - After checking this, you are
given an input to enter the maximum number of purchases any one participant
may make for this reward. Once the participant has reached this limit,
the reward is no longer displayed for him or her at
Shop.Token.
Limit Total Available - Check this to enter the total quantity
available for participants to purchase. You may enter a top limit
or update quantity you have on hand.
The "Remaining QOH" value will
automatically be lowered when items are purchased your participants.
Once quantity on hand is reduced to zero,
the reward will no longer be displayed at
Shop.Token.
This is useful for managing a limited inventory of a tangible rewards.
Do Not Show Reward To Participants - Use this option when either drafting a new
reward or for rewards participants should not see.
You can still make purchases of the reward for participants on the
Participant Window > Purchases Tab.
Delete Reward - Click this button to permanently delete the reward. Be careful
when using this feature because it is not undoable. Also note, after a custom reward
is deleted, you will not be able to retrieve any historical statistics about the reward
as displayed on the "History" tab. The "Delete Reward" is only visible
when their are no pending edits to the reward (it has been saved).
Save Button - This button will become enable if any changes are detected and
the "Reward Name" (item #1) has been entered. Unlike most other
dialogs in Admin.Token, the window does not close after saving so
you can make further edits to the reward if needed.
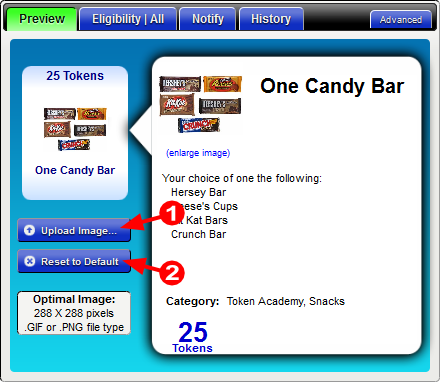 Click here to upload a custom image for the reward.
The button will open your browser's "File Upload" dialog where you can
select an image file from your computer's file system.
Use any image file type (.jpeg, .png, .gif, etc.).
For optimal appearance, try
using an image that's no larger than 288x288 pixels in the .png format
and having equal width and height.
Click this button to delete the reward's custom image file from the Token Rewards web server.
The default custom reward image should then appear.
Click here to upload a custom image for the reward.
The button will open your browser's "File Upload" dialog where you can
select an image file from your computer's file system.
Use any image file type (.jpeg, .png, .gif, etc.).
For optimal appearance, try
using an image that's no larger than 288x288 pixels in the .png format
and having equal width and height.
Click this button to delete the reward's custom image file from the Token Rewards web server.
The default custom reward image should then appear.
 Select the reward's "Eligibility" tab and
toggle the general eligibility from "All Participants" to "Limited...".
Notice the word "None" in the tab title after clicking "Limited",
meaning their are currently no eligible participants to purchase the reward.
Enter a few letters of the participant's name or account code. A list
of participants fitting the search will be displayed.
Click the "Add" button for the correct participant.
Select the reward's "Eligibility" tab and
toggle the general eligibility from "All Participants" to "Limited...".
Notice the word "None" in the tab title after clicking "Limited",
meaning their are currently no eligible participants to purchase the reward.
Enter a few letters of the participant's name or account code. A list
of participants fitting the search will be displayed.
Click the "Add" button for the correct participant.
 The participant is then added to the list of eligible participants. Notice
the tab at the top now states "Eligibility | Limited".
To remove a participant from the list of eligible participants,
click the trash can icon.
The participant is then added to the list of eligible participants. Notice
the tab at the top now states "Eligibility | Limited".
To remove a participant from the list of eligible participants,
click the trash can icon.
 Select the reward's "Eligibility" tab and
toggle the general eligibility from "All Participants" to "Limited...".
Notice the word "None" in the tab title after clicking "Limited".
This means that nobody is eligible to purchase the reward.
Select the "Eligible Classes" sub-tab to add, edit and view the reward's
eligible classes.
From the dropdown selector, choose the class to be eligible for the reward,
then click the "Add Class" button that appears after a class is selected.
Select the reward's "Eligibility" tab and
toggle the general eligibility from "All Participants" to "Limited...".
Notice the word "None" in the tab title after clicking "Limited".
This means that nobody is eligible to purchase the reward.
Select the "Eligible Classes" sub-tab to add, edit and view the reward's
eligible classes.
From the dropdown selector, choose the class to be eligible for the reward,
then click the "Add Class" button that appears after a class is selected.
 The class is then added to the list of eligible classes for the reward. Notice
the tab at the top now states "Eligibility | Limited".
This number represents the active participant count for the class,
showing you exactly how many participants are eligible for the reward
because they have been assigned to the class.
Click the trash can button to remove the class from the list of
reward's eligible classes.
The class is then added to the list of eligible classes for the reward. Notice
the tab at the top now states "Eligibility | Limited".
This number represents the active participant count for the class,
showing you exactly how many participants are eligible for the reward
because they have been assigned to the class.
Click the trash can button to remove the class from the list of
reward's eligible classes.
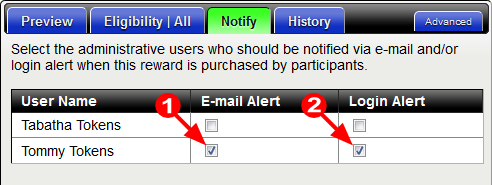 Place a check in the "E-mail Alert" column to have the user administrative
emailed each time the reward is purchased by a participant. The e-mail
contains the participant's name, the custom reward purchased, and
a link to quickly log into
Admin.Token.
Place a check in the "Login Alert" column so the next time the custom reward is
purchased the
Purchase Alerts
dialog will appear once the user logs into Admin.Token.
Place a check in the "E-mail Alert" column to have the user administrative
emailed each time the reward is purchased by a participant. The e-mail
contains the participant's name, the custom reward purchased, and
a link to quickly log into
Admin.Token.
Place a check in the "Login Alert" column so the next time the custom reward is
purchased the
Purchase Alerts
dialog will appear once the user logs into Admin.Token.
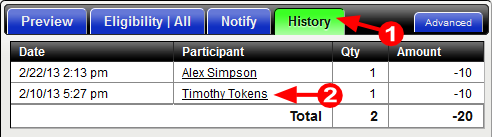 The History tab of the Custom Reward window lists in reverse chronological order
each time the reward was purchased, who purchased it, and what they paid for it.
It also displays the total quantity of the item purchased with the total tokens redeemed.
Click the participant's name to open his/her window.
The History tab of the Custom Reward window lists in reverse chronological order
each time the reward was purchased, who purchased it, and what they paid for it.
It also displays the total quantity of the item purchased with the total tokens redeemed.
Click the participant's name to open his/her window.
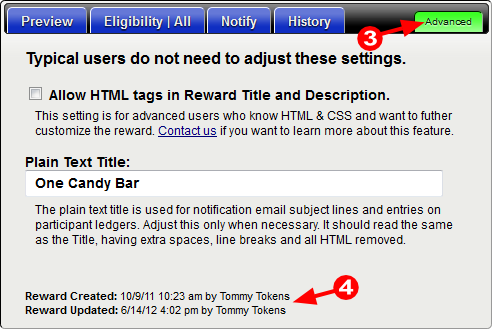 The Reward Window's Advanced tab is for users who want to further
customize the display of the reward at the shop.
You can see who created the reward and when it was last edited.
If it says "Unknown User", it means the person who created or edited the
goal had logged into Admin.Token
using the account's legacy "User Code"
as opposed to their e-mail address.
The Reward Window's Advanced tab is for users who want to further
customize the display of the reward at the shop.
You can see who created the reward and when it was last edited.
If it says "Unknown User", it means the person who created or edited the
goal had logged into Admin.Token
using the account's legacy "User Code"
as opposed to their e-mail address.
 When there are pending purchases of custom rewards by participants this
button is displayed in the header of the My Shop area. Clicking it
will cause the "Custom Reward Purchase Alerts" dialog to appear (see below).
When there are pending purchases of custom rewards by participants this
button is displayed in the header of the My Shop area. Clicking it
will cause the "Custom Reward Purchase Alerts" dialog to appear (see below).
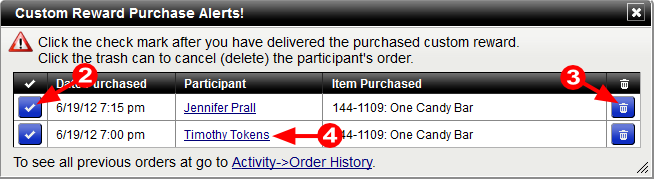 Click this button to change the status of the purchased custom reward
from "Pending" to "Delivered". The purchase will also be removed from the list
of pending purchases on the "Custom Reward Purchase Alerts" dialog.
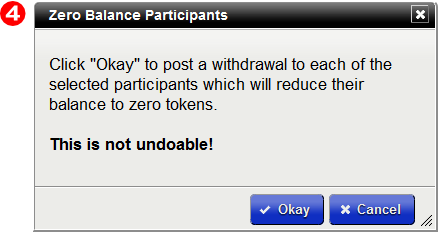
The trash can button will cancel the order for the student and return all spent tokens.
Please be careful when using this feature because it is not undoable.
Click this button to change the status of the purchased custom reward
from "Pending" to "Delivered". The purchase will also be removed from the list
of pending purchases on the "Custom Reward Purchase Alerts" dialog.
The trash can button will cancel the order for the student and return all spent tokens.
Please be careful when using this feature because it is not undoable.
 In this example the Pencil Sharpener is a Warehouse Reward, the Candy Bar is a Custom Reward.
 To remove ALL the Warehouse Rewards from your participant shop,
first open the "My Shop Settings..." dialog.
To remove ALL the Warehouse Rewards from your participant shop,
first open the "My Shop Settings..." dialog.
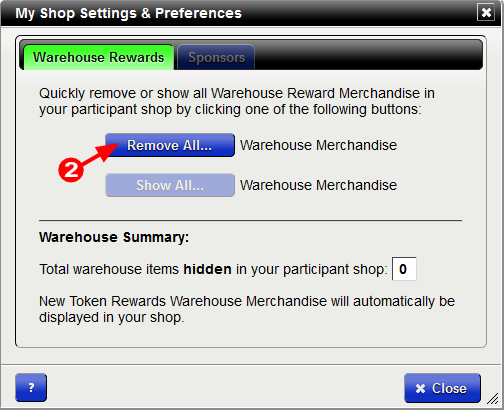 Click the "Remove All..." button to remove all Warehouse Rewards from
your participant shop. Note that this button becomes disabled after
it is clicked. For it to be enabled, some or all the Warehouse Rewards must be displayed.
Click the "Remove All..." button to remove all Warehouse Rewards from
your participant shop. Note that this button becomes disabled after
it is clicked. For it to be enabled, some or all the Warehouse Rewards must be displayed.
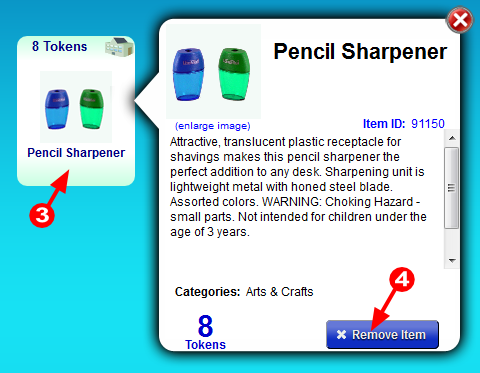 To remove an individual Warehouse Reward from your participant shop,
in the My Shop area click the Warehouse Reward to be removed.
The item's "pop-up" detail is displayed.
Click the "Remove Item" button. The Warehouse Reward will no longer be displayed
to your participants at Shop.Token or in the My Shop area of Admin.Token.
To show ALL the Warehouse Rewards in your participant shop,
first open the "My Shop Settings..." dialog.
To remove an individual Warehouse Reward from your participant shop,
in the My Shop area click the Warehouse Reward to be removed.
The item's "pop-up" detail is displayed.
Click the "Remove Item" button. The Warehouse Reward will no longer be displayed
to your participants at Shop.Token or in the My Shop area of Admin.Token.
To show ALL the Warehouse Rewards in your participant shop,
first open the "My Shop Settings..." dialog.
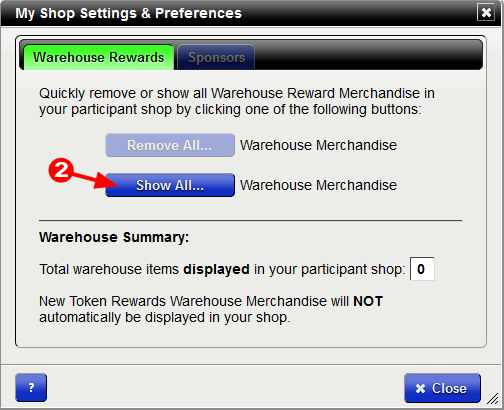 Click the "Show All..." button. Note that this button becomes disabled after
it is clicked. For it to be enabled, some or all the Warehouse Rewards must be hidden.
Click the "Show All..." button. Note that this button becomes disabled after
it is clicked. For it to be enabled, some or all the Warehouse Rewards must be hidden.
 To individually select warehouse items to display, go to the "Warehouse" area of Admin.Token.
 Click the warehouse item you want displayed. The "pop-up" detail about the item
will appear.
Toggle "Display in My Shop?" to the "Yes" option. The item will now be displayed
in your participant shop and in the My Shop area.
Click the warehouse item you want displayed. The "pop-up" detail about the item
will appear.
Toggle "Display in My Shop?" to the "Yes" option. The item will now be displayed
in your participant shop and in the My Shop area.
 Select the "Participant Transactions" tab of the Activity area to list
all deposits and withdrawals to/from participant accounts.
Enter a date range of transactions to summarize and display.
Click the calendar icon to select a date from the small calendar
that drops down when the icon is clicked.
Filter the results to any/all participants who are assigned to the selected class.
Show only the transactions that have been posted by the selected user.
If there is no "Admin User" associated with a transaction, then the transaction
was created by the participant at
Shop.Token.
Click the participant's name to open his/her
Participant Window.
From there you can view all the transactions and details about the participant.
Pending transactions are separated from other withdrawals until the
related Custom Reward is marked delivered or the Warehouse Reward has shipped.
You can view all pending purchases by clicking the
Purchase Alerts button in the
My Shop area or
Participant Orders tab of the Activity area.
Select the "Participant Transactions" tab of the Activity area to list
all deposits and withdrawals to/from participant accounts.
Enter a date range of transactions to summarize and display.
Click the calendar icon to select a date from the small calendar
that drops down when the icon is clicked.
Filter the results to any/all participants who are assigned to the selected class.
Show only the transactions that have been posted by the selected user.
If there is no "Admin User" associated with a transaction, then the transaction
was created by the participant at
Shop.Token.
Click the participant's name to open his/her
Participant Window.
From there you can view all the transactions and details about the participant.
Pending transactions are separated from other withdrawals until the
related Custom Reward is marked delivered or the Warehouse Reward has shipped.
You can view all pending purchases by clicking the
Purchase Alerts button in the
My Shop area or
Participant Orders tab of the Activity area.
 Select the "Participant Purchases" tab of the Activity area to
view a detailed list of all reward purchases made by and for participants.
Enter a date range of purchases to display.
Click the calendar icon to select a date from small calendar
that drops down when the icon is clicked.
Filter the results to any/all participants who are assigned to the selected class.
Use these buttons to toggle the display of reward purchases by their respective status.
Use these buttons to toggle the display of reward purchases by their respective type (Custom vs. Warehouse Rewards).
Shipped Warehouse Rewards will always be associated with an invoice from Token Rewards.
Click the invoice number to view a printable copy of the invoice.
Select the "Participant Purchases" tab of the Activity area to
view a detailed list of all reward purchases made by and for participants.
Enter a date range of purchases to display.
Click the calendar icon to select a date from small calendar
that drops down when the icon is clicked.
Filter the results to any/all participants who are assigned to the selected class.
Use these buttons to toggle the display of reward purchases by their respective status.
Use these buttons to toggle the display of reward purchases by their respective type (Custom vs. Warehouse Rewards).
Shipped Warehouse Rewards will always be associated with an invoice from Token Rewards.
Click the invoice number to view a printable copy of the invoice.
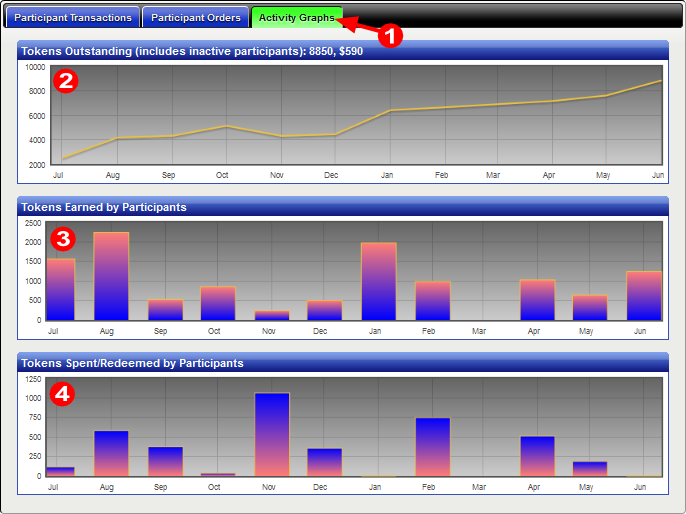 Select the "Activity Graphs" tab of the Activity area to see a general
overview of tokens earned, spent and saved over time.
The "Tokens Outstanding" graph shows the total sum of participant balances by month
over the past year. This is a good indicator of the what amount of tokens are being
"saved-up" by your participants.
The "Tokens Earned" bar graph shows the total sum of participant earnings by month
over the past year.
The "Tokens Spent" bar graph shows the total sum of participant expenditures (reward purchases)
and miscellaneous withdrawals by month over the past year.
Select the "Activity Graphs" tab of the Activity area to see a general
overview of tokens earned, spent and saved over time.
The "Tokens Outstanding" graph shows the total sum of participant balances by month
over the past year. This is a good indicator of the what amount of tokens are being
"saved-up" by your participants.
The "Tokens Earned" bar graph shows the total sum of participant earnings by month
over the past year.
The "Tokens Spent" bar graph shows the total sum of participant expenditures (reward purchases)
and miscellaneous withdrawals by month over the past year.

